How To Add Previous And Next Buttons To Your Blogger Blog Post
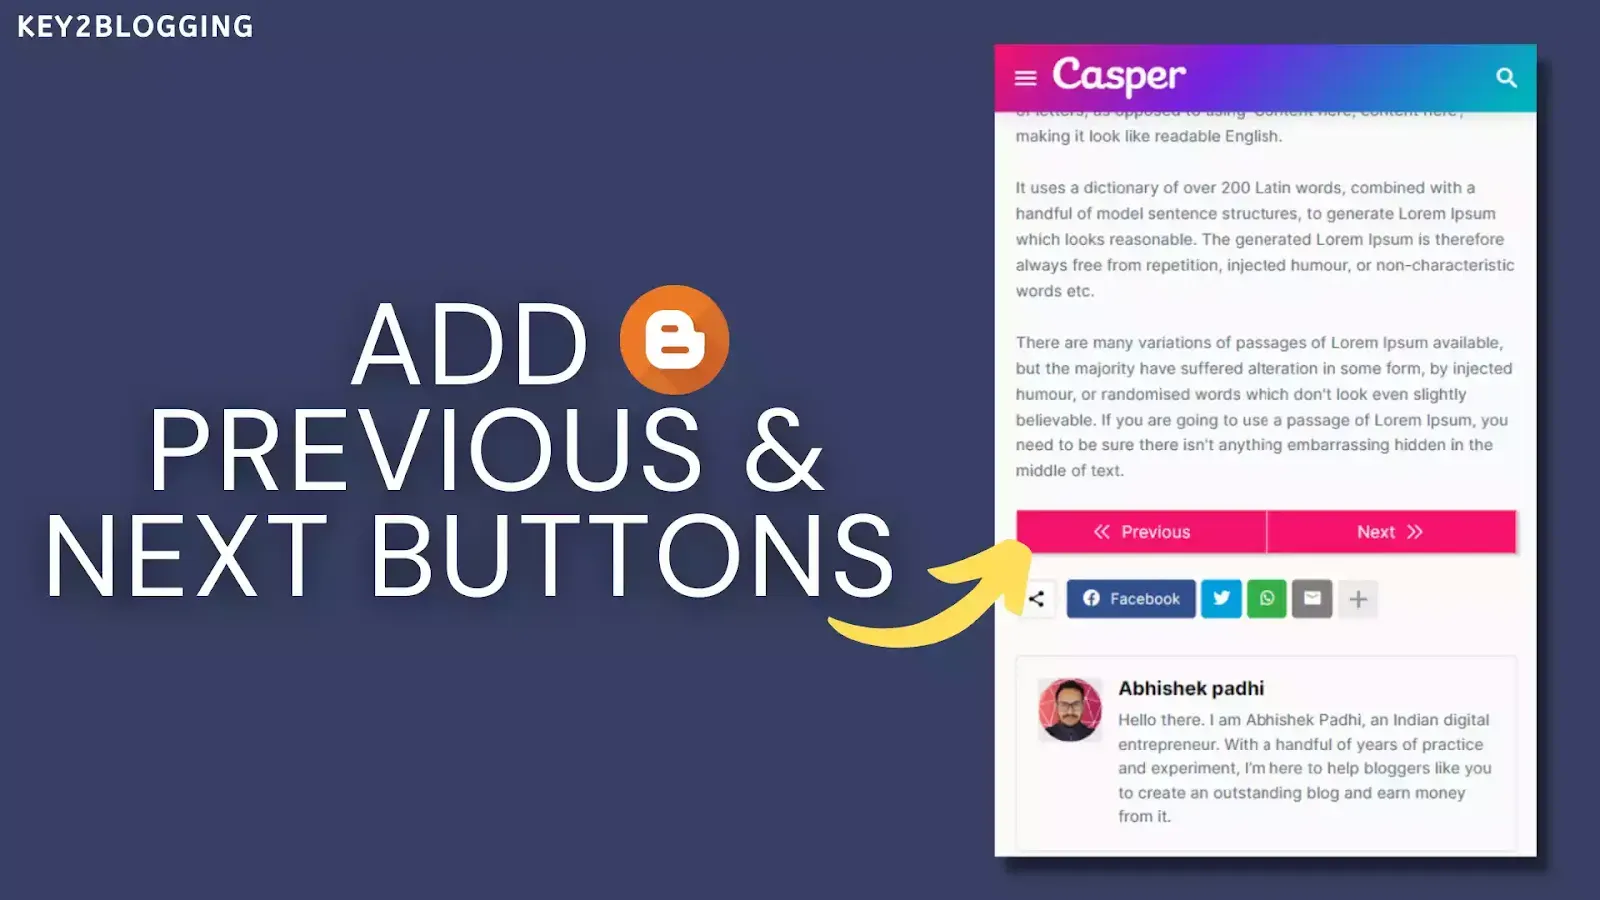
In this article, I will show you how you can add a previous and next button at the end of every Blog post. So, users can easily jump to the immediate next and previous article with a single click.
For, this you need to find the right place to add the HTML and CSS code that i am going to share in this article.
This will help you increase engagement on your blog post and increase the overall page views on your website. So, the bounce rate will reduce and it helps in Search engine Optimization (SEO) also. It helps you boost your website Traffic.
So, let’s follow the steps as shown below.
Steps to Add Previous / Next buttons in Blogger
Log in to your Blogger dashboard and select the theme option.
Now take a backup of your theme and click on the edit HTML section.
Now you need to find the blog widget and under that, you need to find this code <data:post.body/>
Now paste the HTML code just below the code
<b:if cond='data:blog.pageType == "item" '> <div class='K2_Pre_Next'> <b:if cond='data:olderPageUrl'> <a class='pre-btn' expr:href='data:olderPageUrl'> <div class='icon'><svg class='h-6 w-6' fill='none' stroke='currentColor' stroke-width='2' viewBox='0 0 24 24' xmlns='http://www.w3.org/2000/svg'><path d='M11 19l-7-7 7-7m8 14l-7-7 7-7' stroke-linecap='round' stroke-linejoin='round'/></svg></div><div class='label'>Previous</div></a> </b:if> <b:if cond='data:newerPageUrl'> <a class='next-btn' expr:href='data:newerPageUrl'> <div class='label'>Next</div> <div class='icon'><svg class='h-6 w-6' fill='none' stroke='currentColor' stroke-width='2' viewBox='0 0 24 24' xmlns='http://www.w3.org/2000/svg'><path d='M13 5l7 7-7 7M5 5l7 7-7 7' stroke-linecap='round' stroke-linejoin='round'/></svg></div></a> </b:if> </div> </b:if>
Now you need to add the below CSS code just above the ]]></b:skin> or </style> and save the theme code.
/* CSS code for previous-Next button */
.K2_Pre_Next .icon {width: 20px;height: 20px;}
.K2_Pre_Next {display: flex;position: relative;margin-top: 24px;}
.K2_Pre_Next .pre-btn,.K2_Pre_Next .next-btn {display: flex;align-items: center;justify-content: center; gap: 8px;font-family: system-ui;background: #ff1a75; color: #fff;text-decoration: none;padding: 8px 24px;font-size: 16px;min-width: 150px;box-shadow: rgba(0, 0, 0, 0.15) 1.95px 1.95px 2.6px;width: 50%;border-left:1px solid; border-right:1px solid;}
.K2_Pre_Next .pre-btn:hover,.K2_Pre_Next .next-btn:hover{background: #3a8f7b;}
.K2_Pre_Next .next-btn {position: absolute;right: 0;}
a.next-btn:hover, a.pre-btn:hover {text-decoration: none!important;}
.K2_Pre_Next .pre-btn:hover .icon {animation: nav-prev-anim 300ms alternate infinite;}
.K2_Pre_Next .next-btn:hover .icon {animation: nav-next-anim 300ms alternate infinite;}
@keyframes nav-prev-anim { to {transform: translateX(4px);}}
@keyframes nav-next-anim {to {transform: translateX(-4px);}}
Now the Previous and Next buttons will be added automatically to each of your blogger blog posts.
Video Tutorial

Conclusion
I hope this article helps you add the previous and next buttons to your blogger website. If you face any problems during this process then you can ask me in the comment section or social handles like Twitter, Telegram, etc.
You can also share the article on social media and tag us. Thank you 🙂


I’m getting adsense error when I do this
Hi, this is so helpful! I wonder if you know how I can make the button only to navigate through posts within the same label. Just like how taxonomy or series in wordpress works?
Thank you so much. It is working!!!.
Unfortunately this does not work any longer. I used it in the past and it still works with my old blogs. But when I create a new blog, “data:newerPageUrl” points to the post itself instead of to the next post.
Any idea?
Sorry, I have to correct myself.
The problem appears only, if multiple posts are published one after the other in a short time.
I created 3 posts for testing, and published them one after the other.
In this case, the link to the older post still works. But the link to the newer post points to the post itself.
Maybe it’s worth mentioning this. I took me a lot of time to find out, why it did not work as expected. The problem occured even with a publishing date of my third post that showed one minute more, than the publishing date of the second post! So it is not a matter of milliseconds!