How to Add Contact form Popup in Blogger Website?
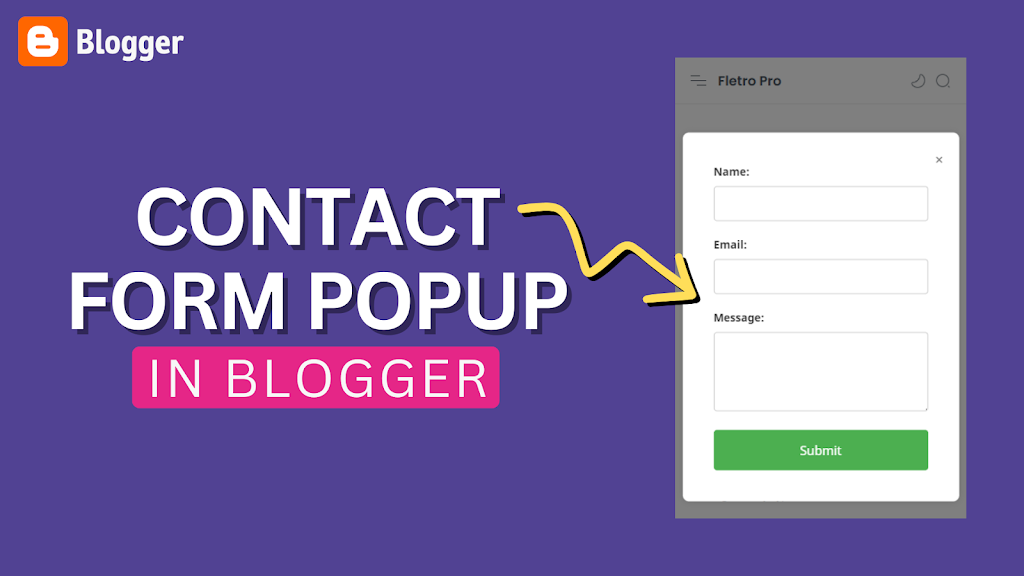
In this Article, You’ll Learn How to Add a Contact form Popup to your Blogger Website and allow users to send Emails to you from any page of your Website.
You can Show this Contact form Popup when someone clicks on the Contact Link on the Header Menu.
All you have to do is Add the following code in the Footer Section of your Website and make sure to Assign the Contact popup key (onclick=”openCustomContactForm()”) in the Header menu Link. Follow the video to Learn More.

This Contact form will Help users to connect with you over Email very easily and they don’t have to Visit the Contact Us page for that. They will be able to access the form from any page of your website just by clicking on the Header Menu Link.
You can further convert the same Link with a button by applying some Basic CSS code. You can follow this video on “How to Add Button in the Navigation Menu of Blogger” for that.
Code for Contact Form Popup in Blogger
<style>
    .custom-contact-popup {
      display: none;
      position: fixed;
      top: 50%;
      left: 50%;
      transform: translate(-50%, -50%);
      background-color: #fff;
      padding: 40px;
      border-radius: 8px;
      width: 600px;
      box-sizing: border-box;
      box-shadow: 0 0 10px rgba(0, 0, 0, 0.1);
      z-index: 1000;
    }

    .custom-label {
      display: block;
      margin-bottom: 10px;
      font-weight: bold;
      color: #333;
    }

    .custom-input,
    .custom-textarea {
      width: 100%;
      padding: 12px;
      margin-bottom: 20px;
      box-sizing: border-box;
      border: 1px solid #ccc;
      border-radius: 4px;
      font-size: 14px;
    }

    .custom-button {
      background-color: #4caf50;
      color: #fff;
      padding: 15px;
      border: none;
      border-radius: 4px;
      cursor: pointer;
      font-size: 16px;
      width: 100%;
      box-sizing: border-box;
      transition: background-color 0.3s;
    }

    .custom-button:hover {
      background-color: #45a049;
    }

    .custom-overlay {
      display: none;
      position: fixed;
      top: 0;
      left: 0;
      width: 100%;
      height: 100%;
      background-color: rgba(0, 0, 0, 0.5);
      z-index: 999;
    }

    .custom-close-button {
      position: absolute;
      top: 20px;
      right: 20px;
      cursor: pointer;
      font-size: 20px;
      color: #777;
    }

    @media only screen and (max-width: 768px) {
      .custom-contact-popup {
        width: 90%;
      }
    }

    @media only screen and (max-width: 480px) {
      .custom-contact-popup {
        width: 95%;
      }
    }
  </style>


<button class="custom-button" onclick="openCustomContactForm()">Open Contact Form</button>

<div class="custom-overlay" onclick="closeCustomContactForm()"></div>
<div class="custom-contact-popup">
  <span class="custom-close-button" onclick="closeCustomContactForm()">×</span>
  <form action="https://formsubmit.co/Your_Email_Address" method="POST">
    <label class="custom-label" for="name">Name:</label>
    <input class="custom-input" type="text" id="name" name="name" required=""/>

    <label class="custom-label" for="email">Email:</label>
    <input class="custom-input" type="email" id="email" name="email" required=""/>

    <label class="custom-label" for="message">Message:</label>
    <textarea class="custom-textarea" id="message" name="message" rows="4" required></textarea>

    <button class="custom-button" type="submit">Submit</button>
  </form>
</div>

<script>
  function openCustomContactForm() {
    document.querySelector(".custom-contact-popup").style.display = "block";
    document.querySelector(".custom-overlay").style.display = "block";
  }

  function closeCustomContactForm() {
    document.querySelector(".custom-contact-popup").style.display = "none";
    document.querySelector(".custom-overlay").style.display = "none";
  }
</script>
Note: If you are using it in the Header Menu, then you don’t need to add the Button HTML code as shown below. All you need is the highlighted part in the Link Element.
<button class="custom-button" onclick="openCustomContactForm()">Open Contact Form</button>
I hope you have successfully added the popup contact form to your Blogger Website. If you have any doubt, you can ask in the comment section.

![How to add a pros and cons table in Blogger? [Responsive]](https://www.techyleaf.in/wp-content/uploads/2021/07/Pros-and-Cons-table-in-Blogger-Techyleaf-768x432.webp)


