How to Add a Toast Notification Popup to Blogger website
In this Article, You will learn how to add a Toast Popup Notification to your Blogger website. Here, I have created this notification Popup using HTML, CSS & Javascript.
You can easily use it on your website without worrying about page speed issues.
This is a great way to share key updates, and special offers or add a Call To Action (CTA) button to your Product or services. This type of notification helps increase CTR on the website and boost conversions.
So, let’s check how you can add this notification popup to the Blogger website.
First of All, Go to the Blogger dashboard and click on the theme section.
Now take a backup of your theme and then click on the Edit HTML option in the drop-down menu.
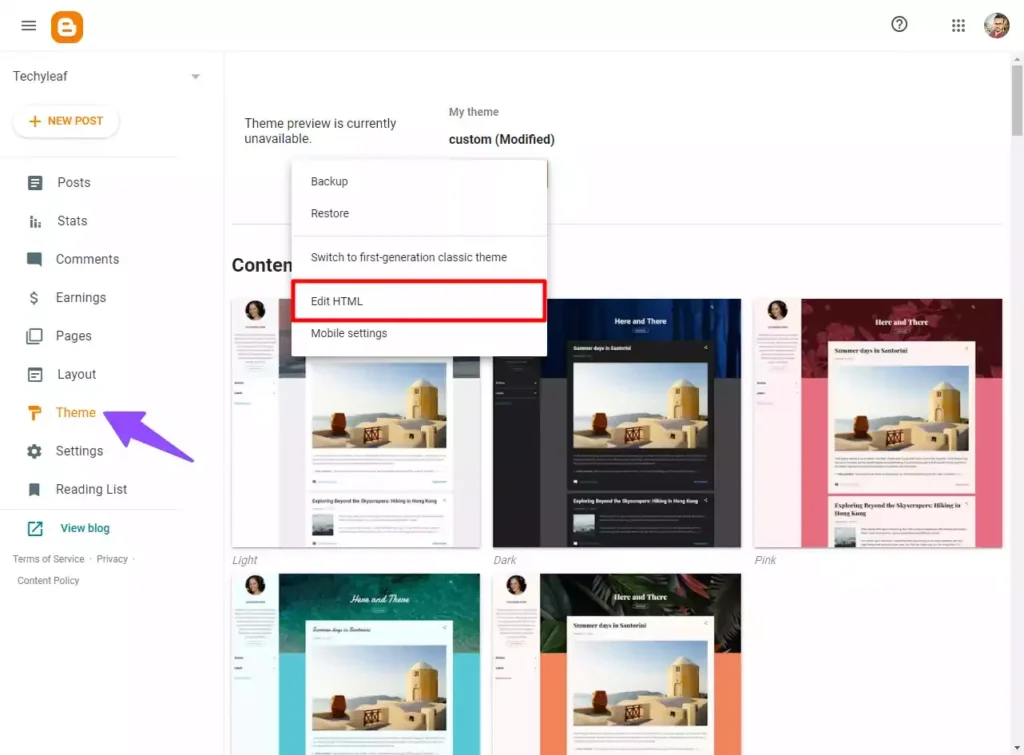
Now Go to the end of the theme code and search for the closing body tag. (</body>)
You need to paste the given code just above it.
<div class="T-container">
<div class="T-close">X</div>
<div class="T-icon">
<!-- Replace this with your Telegram SVG icon -->
<svg xmlns="http://www.w3.org/2000/svg" width="30" height="30" viewbox="0 0 64 64">
<path d="M56.4,8.2l-51.2,20c-1.7,0.6-1.6,3,0.1,3.5l9.7,2.9c2.1,0.6,3.8,2.2,4.4,4.3l3.8,12.1c0.5,1.6,2.5,2.1,3.7,0.9 l5.2-5.3c0.9-0.9,2.2-1,3.2-0.3l11.5,8.4c1.6,1.2,3.9,0.3,4.3-1.7l8.7-41.8C60.4,9.1,58.4,7.4,56.4,8.2z M50,17.4L29.4,35.6 c-1.1,1-1.9,2.4-2.0,3.9c-0.2,1.5-2.3,1.7-2.8,0.3l-0.9-3c-0.7-2.2,0.2-4.5,2.1-5.7l23.5-14.6C49.9,16.1,50.5,16.9,50,17.4z"></path>
</svg>
</div>
<div class="text-content">
<h3>
Hi, Welcome to Techyleaf. Join Our Telegram Channel to get latest updates
<a href="https://t.me/key2blogging" class="T-button">
Join Now <span>→</span>
</a>
</h3>
</div>
</div>
<style>
/* Adjust Popup Background Here */
.T-container {
position: fixed;
bottom: -140px;
width: 90%;
max-width: 720px;
display: flex;
align-items: center;
background: #05344b;
color: white;
font-family: "system-ui", sans-serif;
padding: 12px 16px;
border-radius: 10px;
box-shadow: rgba(0, 0, 0, 0.15) 0px 2px 8px;
left: 50%;
transform: translateX(-50%);
transition: all 1800ms ease;
z-index: 90000;
}
.T-container.active {
bottom: 20px;
}
.T-container .text-content h3 {
color: white;
font-size: 17px;
font-family: system-ui;
padding: 20px 0;
font-weight: 500;
line-height: 20px;
}
.T-container .text-content {
padding: 0 24px;
padding-right: 40px;
}
/* Adjust Button Background Here */
.T-button {
display: inline-block;
padding: 5px 13px;
background-color: lightyellow;
border-radius: 8px;
text-decoration: none;
color: #333;
margin: 10px 0px 0px 0px;
cursor: pointer;
}
.T-button span {
margin-left: 8px;
}
/* Adjust Icon Background Here */
.T-container .T-icon {
text-align: center;
background-color: #0077aa;
border-radius: 6px;
padding: 10px;
box-shadow: rgba(0, 0, 0, 0.15) 1.95px 1.95px 2.6px;
}
/* Adjust Icon Size Here */
.T-container .T-icon svg {
fill: white;
width: 30px;
height: 30px;
}
.T-container .T-close {
position: absolute;
top: 10px;
right: 10px;
font-size: 14px;
font-weight: 700;
cursor: pointer;
}
</style>
<script>
const toastContainer = document.querySelector(".T-container");
const closeBtn = document.querySelector(".T-close");
const toastLink = document.querySelector(".T-button");
const hideToastFor30Days = () => {
const currentDate = new Date();
const expirationDate = new Date(currentDate.getTime() + 30 * 24 * 60 * 60 * 1000); // 30 days in milliseconds
localStorage.setItem("toastExpirationDate", expirationDate.getTime());
toastContainer.classList.remove("active");
};
if (!localStorage.getItem("toastExpirationDate") || new Date().getTime() > localStorage.getItem("toastExpirationDate")) {
setTimeout(() => {
toastContainer.classList.add("active");
}, 1000);
}
closeBtn.addEventListener("click", hideToastFor30Days);
toastLink.addEventListener("click", hideToastFor30Days);
</script> Now, change the Call to Action Link, SVG Icon, Description, etc, and save the theme code.
Now the Toast Notification Popup is added to the Blogger website.

You can also load this popup to individual pages or pages like Homepage, Post page, static pages etc using the Blogger Conditional Tags.
You can easily customize this by tweaking the CSS code. Follow the video to learn More.
If this is helpful to you feel free to share it with your Fellow Bloggers.
If you have any doubts regarding this, feel free to ask in our Telegram Group.



Great code. However, it seems that some elements “override” the pop up. Is there a way to ensure the pop up is above all elements on the screen?
Updated the code, You can Adjust the Z-index value to a higher value if it is not showing above all content.