Best Way to Buy WordPress Hosting and Claim a Free Domain Name
Choosing the right web hosting for your WordPress site is one of the most important decisions you’ll make as a blogger.
With so many options and flashy deals, it’s easy to overspend or end up with an unreliable host that slows down your website and frustrates your visitors. If you’re unsure where to start or worried about picking the wrong plan, this guide will walk you through the essentials.
You’ll learn how to find budget-friendly, high-quality web hosting—and get a free domain name—so you can launch your site with confidence and avoid costly beginner mistakes.

What is web hosting?
Web hosting is a service that allows you to make your website available on the internet by storing its files—such as images, text, and code—on a special computer called a server.
When someone enters your website’s address into their browser, the server sends all the necessary data to display your site on the visitor’s device.
In simple terms, web hosting is like renting space on the internet for your website, ensuring it’s always accessible online. Hosting providers manage these servers, offer security features, handle maintenance, and keep your site running 24/7. Every website you visit is hosted on a server operated by a hosting provider.
In this guide, I’ll walk you through the simple step-by-step process of purchasing a hosting plan from Hostinger, one of the most affordable and reliable options for WordPress hosting. Hostinger stands out with its beginner-friendly dashboard, excellent customer support, and budget-friendly pricing—ideal for new bloggers or anyone looking for great value.
A major perk: when you sign up with Hostinger, you get a free domain name for your first year, which helps save money and lets you manage your site and domain easily in one place. You’ll also benefit from a complimentary SSL certificate for enhanced security, and the flexibility to use the latest PHP versions for top-notch performance.
Ready to start? Let’s dive in and see how to set up your website using Hostinger, ensuring you get the best mix of value and quality from day one.
Disclaimer: This article does contain affiliate links. If you purchase anything from these links, we will get a small commission, at no additional cost to you.
Necessary requirement:
Domain name: A unique domain name for your website. if you have an existing domain name then you can use that domain. (you can use your free domain name in the future if you don’t need it now)
payment mode: you can use a credit card, debit card, or PayPal as your preferred payment method.
Here’s a comprehensive step-by-step process to purchase hosting from Hostinger and claim your free domain:
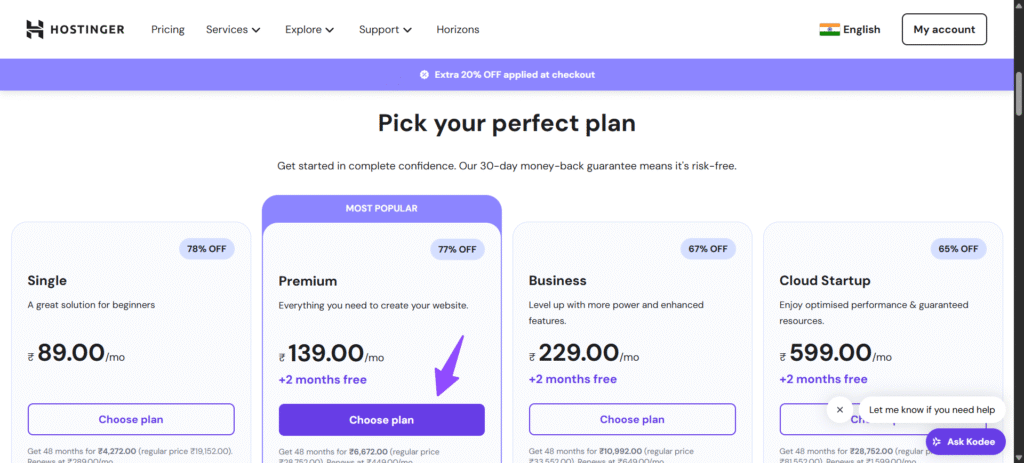
Step 1: Choose the Right Hosting Plan
To get a free domain with Hostinger, you need to select specific plans:
- Premium or Business shared hosting plans (not the Single plan)
- WordPress hosting plans
- Cloud hosting plans
- Website Builder plans (Premium or Business)
The free domain offer is only available when you purchase 12 months or longer terms – it’s not available with monthly plans.
Step 2: Visit Hostinger Website
- Go to the Hostinger website
- Browse the hosting plans section
- Compare different plans and their features
Step 3: Select Your Hosting Plan
- Click on your preferred hosting plan (Premium or Business recommended for free domain)
- Choose your billing cycle – select 12 months, 24 months, or 48 months to qualify for the free domain
- Review the pricing – longer terms typically offer better discounts
Step 4: Apply Discount Codes (Optional)
Discount Code will be auto applied when you go through our Affiliate Link. You will get Additional 20% Discount along with the standard discount. So, Make sure to use Our Hostinger Link and save money during checkout.
Step 5: Complete Your Purchase
- Select your payment method (credit card, PayPal, etc.)
- Enter your billing information
- Create your Hostinger account by providing:
- Full name
- Email address
- Password for your account
- Click “Submit secure payment” or similar button to complete the purchase
Step 6: Access Your Hostinger Dashboard
- After payment, you’ll receive a confirmation email
- Log in to your Hostinger hPanel (control panel)
- Set up your account password if prompted
Step 7: Claim Your Free Domain
There are two ways to claim your free domain:
Method A: During Initial Setup
- Click the “Start Now” or “Setup” button in your dashboard
- Follow the hosting setup wizard
- When prompted to enter your domain name, you’ll see eligible free domain options in a dropdown
- Select your preferred domain extension from the free options
Method B: From Dashboard
- In your hPanel home page, look for the “Claim Domain” button in the Account Actions section
- Click “Claim your free domain”
- Enter your desired domain name
- Check availability and confirm it’s eligible for free registration
- Complete the domain registration process
Step 8: Configure Your Domain and Hosting
- Once your domain is claimed, it will be automatically connected to your hosting account
- You can now proceed to install WordPress or other applications
- Set up your website using the tools provided in your hPanel
Important Notes:
- Free domain validity: The free domain is valid for the first year only
- Domain extensions: Popular extensions like .com, .net, .org are typically included in the free offer
- Domain privacy: Consider adding domain privacy protection to hide your personal information from public WHOIS records
- Renewal: After the first year, you’ll need to pay the regular renewal fee for your domain
What’s Included:
- Web hosting for your chosen term
- Free domain registration for one year
- Free SSL certificate
- Email accounts
- Website builder tools (depending on your plan)
- 24/7 customer support
This process typically takes 10-15 minutes to complete, and you’ll have your hosting account and free domain ready to use immediately after purchase.

You can contact me over email or the social media account is given on the Contact us page.
If you find this guide helpful, be sure to share it with your friends on Facebook, Twitter, and WhatsApp. Thank you.👍